This is an old revision of the document!
Lipsync
Lipsync is the process of animating a character's mouth to match spoken words.
It's a tricky and somewhat time consuming process, but it is possible to do lipsync in the Thrixxx simulators.
For the Gamerotica welcome video, The character Trixi has lipsync animation at the start and end of the video. This Wiki page is a bit of a “post-mortem” on that process. Play the video below to see the finished result.
NOTE Before attempting this process, you should be familiar with creating basic animation in the Pose Editor as well as video and sound editing using a video editing package. This is not a polished step by step tutorial for beginners and is presented as-is. However, it should give you a good head start if you are trying to do your own lipsync in 3D Sexvilla 2.
Quick overview of lipsync theory
Speech can generally be broken down into a limited number of visual phonemes. These represent common mouth positions that match certain sounds.
Animators traditionally use this table of shapes as a guideline
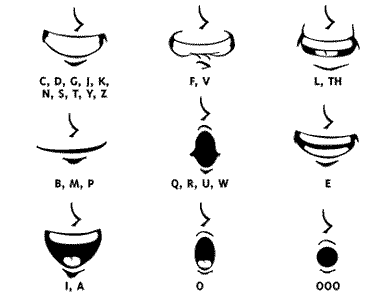
It is possible and practical to use a smaller set of phonemes to create lipsync. In fact, if you can get the mouth opening and closing at approximately the right times that will be good enough for many cases. Anything beyond that is polish and gravy.
The most important positions are CDG, BPM, OOO and FV. Visually, the animation will read pretty well if you just use these positions.
Tools used
- Sound recording equipment and software There are oodles of solutions for this. I use an H2 Zoom recorder which records to an SD card. You can use any sound editor. Audigy is a good free one.
- Video editor I used Premiere but you can use anything that allows you to cut video together.
- Fraps I used Fraps to record the video from Sexvilla 2. You need to use a third party recorder like this to record the timeline image in the Pose Editor.
Establishing a sync reference
This is the real trick to being able to do this AT ALL. Since you can't (currently) import your own sound file into 3D Sexvilla 2, you need some way of knowing at what frame in the Pose Editor to create the correct phonemes. Fortunately, we can use the Pose Editor timeline as a sync reference.
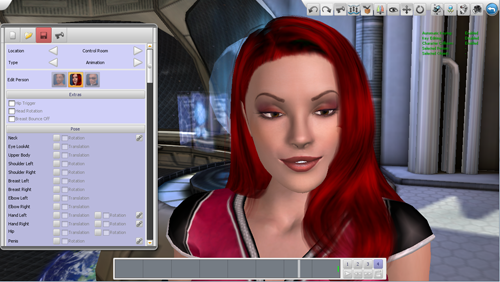
We start by recording a blank animation from Sexvilla 2. We import this into the video editing software and add the voice track. Now we can scrub to a point in time in the video editor where there is a specific phoneme (E.g. “MBP”) and look at the timeline to see where to create that phoneme keyframe in the Pose Editor.
How to do it step by step
- Record your narration and edit it to the correct length. You want this to be FINAL before you start.
- Set up your model in the Pose Editor so you can see her face full on. Set at least one keyframe at the end of the fourth animation slot so that the animation will play all the way through. Hit the Play button in the Timeline bar and Record the video playing all the way through using Fraps. I found that starting the recording just before the end of the fourth section allowed me to easily find the first frame of the first section when I was editing. NOTE: It's best to do the lipsync as the first step before you do any other animation. Otherwise it will be difficult to see the mouth positions clearly.
- Import the video into your video editing software. Trim the video to start at the first frame of the first section (of the Pose Editor timeline). Line up the audio so it starts a bit after the start to give yourself some breathing room. This will now be your master reference. (Optional but recommended: Do the “record your lips” step in the additional tips below)
- Open up the Pose Editor and your video editing software so they are side-by-side. It helps if you have a dual monitor setup but it's not critical.
- Scrub the video/audio in the video editing software to the first phoneme (E.g. “W” sound in “welcome”)
- look at the timeline in the reference video and note where the “current frame” is. In the image below the current frame is in animation segment #1 in the middle of the second section.

(Note: If you want to get more accurate then this or have a clearer reference you can record some “dummy” keyframes throughout the animation to fine tune this reference. They will show up as keyframes in the timeline. I found that being approximate was close enough and it was easy enough to shift the keys around if I needed to.) - Now go to the same approximate frame in the Pose Editor and set a keyframe for the matching phoneme position (E.g. “W”).
- Go through at least one full spoken sentence with this process and set the key phonemes. Don't sweat every last sound. Get the four main phoneme shapes (see above) and play it back to see how it looks. You can always add more detail where you need it later.
- Scrub through the animation in the Pose Editor while playing back the speech in your head. Does it look like she is saying the words? Refine it until it looks pretty good.
- Record the video in the Pose Editor using Fraps again.
- Bring the video into your video editing software. Trim the video to start at the first frame of the timeline animation like you did before. It should line up with the audio.
- Rinse and repeat until you're satisfied with the lipsync
- add some facial expressions to compliment the lipsync
- complete whatever other animation is required for your model
- When you are finished, hit CTRL+ALT+G to hide the interface when you record the final video.
Some lipsync settings for the Pose Editor
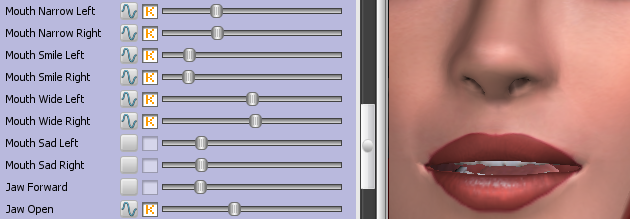
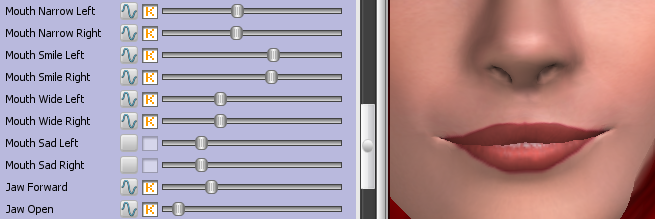
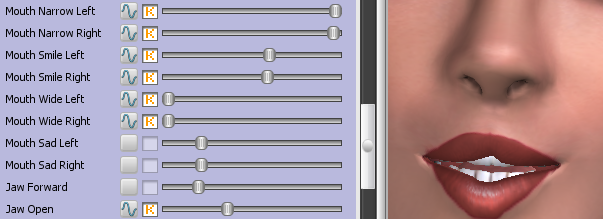
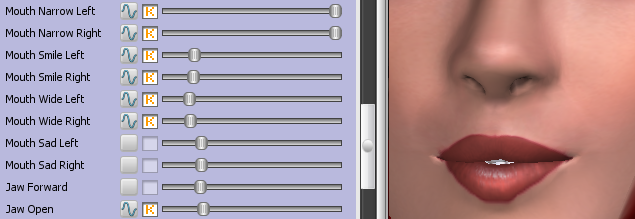
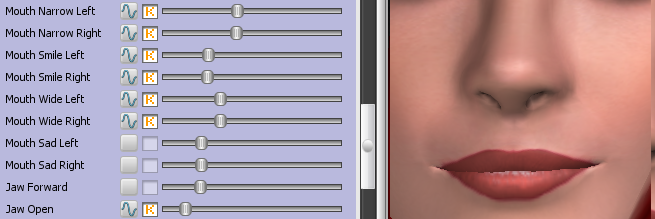
Since the Pose Editor does not currently have proper phoneme shapes, I used a small set of the existing sliders to approximate the phoneme shapes. I set keyframes on all of these sliders for each phoneme to be consistent and get predictable animation. Use this as a starting point and feel free to tweak and add more shapes as required.
Additional Tips
- Film your lips I did one other thing that was incredibly useful. I recorded a close-up of my own lips saying the words, ensuring that my lips matched as close as possible. I then took that video, cropped it and overlaid it on the reference video. This takes most of the guesswork out of what position goes where and allows you to see which positions flow into other positions. Of course, if you can film your original voice actor saying the lines with facial expressions that's even better.
- Use the Key Editor Once you have a good setting for a particular phoneme, you can use the Key Editor to copy those keyframes to another place with the same phoneme. You can also slide keyframes around by selecting them and using the middle mouse button.
Finishing Touches
When you've completed your lipsync to your satisfaction, it's time to do the secondary animation. This is stuff like moving the head, body, etc. The best way to approach this is to ACT IT OUT. Animators are essentially actors. A really effective technique is to film yourself or someone else acting out the lines and then use that as reference for the animation. A small hand mirror can also be very useful.
